こんにちは。プリントシール機事業部 ソフトウェア開発担当の土田です。
皆さんはゲーム等でアニメーションを付ける時、どうやってアニメーションを付けていきますか?
今回は、Unityを使ってC#上で頂点やUV座標を指定してアニメーションをしていこうと思います!
板ポリを表示する
まずは板ポリをアニメーションさせずに表示させます。

まず初めに任意のテクスチャをAsset内に追加します。(今回はペンギンの画像を使います。)
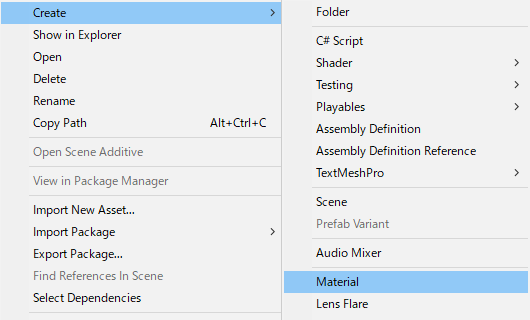
Project のAssets の中で右クリックをし、Material を選択します。
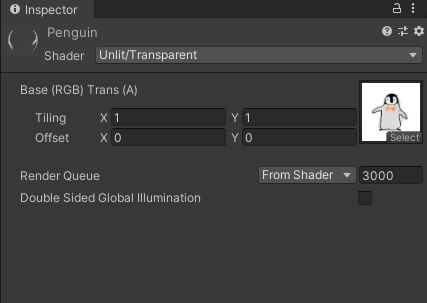
そして今回は光源処理の影響を受けない「Unlit/Transparent」を指定します。
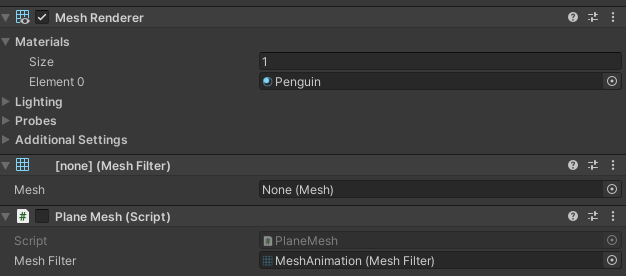
次にHierarcy 内で任意のGameObject を新規で作成し、そこに「Mesh Renderer」と 「Mesh Filter」を追加します。
    [SerializeField]
    private MeshFilter meshFilter;

    void Start()
    {
        Mesh mesh = new Mesh();
        List<Vector3> vertexList = new List<Vector3>();
        vertexList.Add(new Vector3(0.0f, 0.0f, 0.0f));
        vertexList.Add(new Vector3(1.0f, 0.0f, 0.0f));
        vertexList.Add(new Vector3(0.0f, 1.0f, 0.0f));
        vertexList.Add(new Vector3(1.0f, 1.0f, 0.0f));
        mesh.SetVertices(vertexList);

        List<Vector2> uvList = new List<Vector2>();
        uvList.Add(new Vector2(0.0f, 0.0f));
        uvList.Add(new Vector2(1.0f, 0.0f));
        uvList.Add(new Vector2(0.0f, 1.0f));
        uvList.Add(new Vector2(1.0f, 1.0f));
        mesh.SetUVs(0, uvList);

        List<int> indexList = new List<int> { 0, 2, 1, 1, 2, 3 };
        mesh.SetIndices(indexList.ToArray(), MeshTopology.Triangles, 0);

        meshFilter.mesh = mesh;
    }
meshFilter には先程追加した、MeshFilter をUnity Editor上で指定します。
mesh.SetVertices で頂点を登録します。
mesh.SetUVs でUV座標を登録します。第一引数はチャンネルですが、1チャンネルなので、0固定です。
mesh.SetIndices で三角形を作るうえでどの頂点を使うかを設定します。第二引数は三角形なので、MeshTopology.Triangles、第三引数はどのマテリアルに当てはめるかなので0 を指定します。
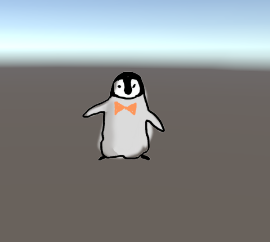
これでペンギンが表示されるようになりました。
スクロールさせてみる
それではまずはスクロールをさせてみましょう!

下準備としてテクスチャのWrap Mode がリピートであることを確認しましょう。
この設定でuv が1を超えたときに、リピートしてテクスチャを表示してくれます。
そして、mesh をメンバ変数にして、Update で以下のようにコードを変更します。
    float v0 = 0.0f;

    void Update()
    {
        v0 += Time.deltaTime;
        float v1 = v0 + 1.0f;

        List<Vector2> uvList = new List<Vector2>();
        uvList.Add(new Vector2(0.0f, v0));
        uvList.Add(new Vector2(1.0f, v0));
        uvList.Add(new Vector2(0.0f, v1));
        uvList.Add(new Vector2(1.0f, v1));
        mesh.SetUVs(0, uvList);
    }
これでペンギンがスクロールするようになりました。
ガラスが割れたような演出をしてみる
ガラスが割れたような演出を行っていきます。 任意の点に対して、良い感じの三角形を作ってくれる手法としてドロネー分割という手法があるのですが、 今回は割愛して、固定の三角形で行っていきます。
まずは固定の三角形を作ります。今回は7頂点で8個の三角形を作ります
また、頂点リストは後々Update で使うので、メンバ変数に移動させておきます。
ついでに名前もvertexStartList に変更しておきます。
    [SerializeField]
    private MeshFilter meshFilter;

    private Mesh mesh;
    private List<Vector3> vertexStartList = new List<Vector3>();

    void Start()
    {
        mesh = new Mesh();
        vertexStartList.Add(new Vector3(0.0f, 0.0f, 0.0f));
        vertexStartList.Add(new Vector3(0.0f, 1.0f, 0.0f));
        vertexStartList.Add(new Vector3(0.3f, 0.4f, 0.0f));
        vertexStartList.Add(new Vector3(0.0f, 0.0f, 0.0f));
        vertexStartList.Add(new Vector3(0.3f, 0.4f, 0.0f));
        vertexStartList.Add(new Vector3(0.7f, 0.2f, 0.0f));
        vertexStartList.Add(new Vector3(0.0f, 0.0f, 0.0f));
        vertexStartList.Add(new Vector3(0.7f, 0.2f, 0.0f));
        vertexStartList.Add(new Vector3(1.0f, 0.0f, 0.0f));
        vertexStartList.Add(new Vector3(0.3f, 0.4f, 0.0f));
        vertexStartList.Add(new Vector3(0.0f, 1.0f, 0.0f));
        vertexStartList.Add(new Vector3(0.5f, 0.8f, 0.0f));
        vertexStartList.Add(new Vector3(0.3f, 0.4f, 0.0f));
        vertexStartList.Add(new Vector3(0.5f, 0.8f, 0.0f));
        vertexStartList.Add(new Vector3(0.7f, 0.2f, 0.0f));
        vertexStartList.Add(new Vector3(0.5f, 0.8f, 0.0f));
        vertexStartList.Add(new Vector3(1.0f, 1.0f, 0.0f));
        vertexStartList.Add(new Vector3(0.7f, 0.2f, 0.0f));
        vertexStartList.Add(new Vector3(1.0f, 0.0f, 0.0f));
        vertexStartList.Add(new Vector3(0.7f, 0.2f, 0.0f));
        vertexStartList.Add(new Vector3(1.0f, 1.0f, 0.0f));
        vertexStartList.Add(new Vector3(0.0f, 1.0f, 0.0f));
        vertexStartList.Add(new Vector3(1.0f, 1.0f, 0.0f));
        vertexStartList.Add(new Vector3(0.5f, 0.8f, 0.0f));

        mesh.SetVertices(vertexStartList);

        List<Vector2> uvList = new List<Vector2>();
        foreach(var vertex in vertexStartList)
        {
            uvList.Add(new Vector2(vertex.x, vertex.y));
        }
        mesh.SetUVs(0, uvList);

        mesh.SetIndices(Enumerable.Range(0, 24).ToArray(), MeshTopology.Triangles, 0);

        meshFilter.mesh = mesh;
    }
これでいつでも分割させられる準備が出来ました。
後はUpdate で頂点を移動させていきます。今回は1秒待機させて、そのあとに0.03秒ずつ移動させていこうと思います。
    float timer = 0.0f;
    void Update()
    {
        timer += Time.deltaTime;
        List<Vector3> vertexList = new List<Vector3>();
        for (int i = 0; i < vertexStartList.Count; i += 3)
        {
            // 最初に1秒待機させて、それ以降は0.1秒ごとにそれぞれを落としていく
            float fallTime = timer - 1.0f + 0.03f * i;
            for (int j = i; j < i + 3; j++)
            {
                float addX = 0.0f;
                float addY = 0.0f;
                if (fallTime >= 0.0f)
                {
                    addY = -fallTime * fallTime + fallTime;
                    addX = 0.2f * fallTime; // 0.2f は微調整
                    if (vertexStartList[i].x < 0.5f)
                    {
                        addX  = -addX;
                    }
                }
                vertexList.Add(new Vector3(vertexStartList[j].x + addX, vertexStartList[j].y + addY, 0.0f));
            }
        }
        mesh.SetVertices(vertexList);
    }
ちょっとガラスが割れたというには勢いが足りませんが、良い感じでテクスチャが分割されました。
Z軸もいじってみる
最後に今まではX軸、Y軸だけのアニメーションでしたが、Z軸もいじってみましょう。
まずは、頂点の数を10×10 で100 個用意します。
    private const int vertexXNum = 10;
    private const int vertexYNum = 10;

    void Start()
    {
        mesh = new Mesh();
        for (int y = 0; y < vertexYNum; y++)
        {
            for (int x = 0; x < vertexXNum; x++)
            {
                vertexStartList.Add(new Vector3((float)(x) / vertexXNum, (float)(y) / vertexYNum, 0.0f));
            }
        }
        mesh.SetVertices(vertexStartList);

        List<Vector2> uvList = new List<Vector2>();
        foreach (var vertex in vertexStartList)
        {
            uvList.Add(new Vector2(vertex.x, vertex.y));
        }
        mesh.SetUVs(0, uvList);

        List<int> indexList = new List<int>();
        for (int y = 0; y < vertexYNum - 1; y++)
        {
            for (int x = 0; x < vertexXNum - 1; x++)
            {
                List<int> rectIndexList = new List<int> { (y + 0) * 10 + x,
                                                          (y + 1) * 10 + x ,
                                                          (y + 0) * 10 + x + 1,
                                                          (y + 0) * 10 + x + 1,
                                                          (y + 1) * 10 + x,
                                                          (y + 1) * 10 + x + 1};
                indexList.AddRange(rectIndexList);
            }
        }
        mesh.SetIndices(indexList.ToArray(), MeshTopology.Triangles, 0);

        meshFilter.mesh = mesh;
    }
ここから中心座標がZ軸の移動量のMax になるように反復運動をします。
    readonly Vector2 center = new Vector2(0.5f, 0.5f);
    float addZMax = 0.0f;
    float addZVector = 1.0f;
    void Update()
    {
        List<Vector3> vertexList = new List<Vector3>();
        addZMax += Time.deltaTime * addZVector;
        if (addZMax >= 2.0f)
        {
            addZMax    = 2.0f;
            addZVector = -1.0f;
        }
        else if (addZMax <= 0.0f)
        {
            addZMax    = 0.0f;
            addZVector = 1.0f;
        }
        for (int i = 0; i < vertexYNum * vertexXNum; i++)
        {
            // 中心との距離を求めて0.5f 以下のものに適用させる
            float addZ = 0.0f;
            float distance = Vector2.Distance(new Vector2(vertexStartList[i].x, vertexStartList[i].y), center);
            if (distance < 0.5f)
            {
                addZ = -addZMax * Mathf.Cos(distance / 0.5f * Mathf.PI / 2.0f);
            }
            vertexList.Add(new Vector3(vertexStartList[i].x, vertexStartList[i].y, addZ));
        }
        mesh.SetVertices(vertexList);
    }
これでペンギンのお腹が膨らんだり、へこんだりするようになりました。
最後に
いかがだったでしょうか?
恐らく処理負荷を真面目に考えるのでしたら、シェーダーで作った方が良かったりすると思います。
ただ、今回のようにC#で書いてみるとシェーダーに比べて処理の流れが分かりやすいと思われた方もいらっしゃると思います。
皆様のアニメーション作りの参考になれば幸いです。