こんにちは。ピクトリンク事業部の古川です。
今回は、Google IO 2018アプリで突如現れて衝撃的だった、BottomAppBarにめり込んだFloatingActionButtonの実装方法を紹介します。
このようなレイアウトです。
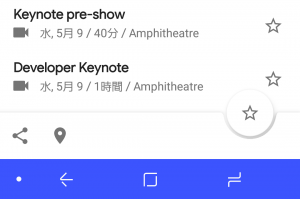
下部のView(ここではおそらくBottomAppBarのみ)にFloatingActionButtonがめり込んでいて、被る部分はうまく避けられています。
今回の最終形態は次のような画面を目指します。
事前準備
app/build.gradleに必要なものを追加します。
dependencies {
    implementation 'androidx.appcompat:appcompat:1.0.0-rc01'
    implementation 'com.google.android.material:material:1.0.0-rc01'
}
BottomAppBarを設置する
今回実装したい方法を実現するには、BottomAppBarを利用します。
また、BottomAppBarはCoordinatorLayoutを親に持つ必要があることに注意してください。
<androidx.coordinatorlayout.widget.CoordinatorLayout xmlns:android="http://schemas.android.com/apk/res/android"
    xmlns:app="http://schemas.android.com/apk/res-auto"
    android:layout_width="match_parent"
    android:layout_height="match_parent">

<!-- ... -->

    <com.google.android.material.bottomappbar.BottomAppBar
        android:id="@+id/bottom_app_bar"
        android:layout_width="match_parent"
        android:layout_height="56dp"
        android:layout_gravity="bottom"
        app:backgroundTint="@color/colorPrimary"
        app:fabAlignmentMode="center" />

</androidx.coordinatorlayout.widget.CoordinatorLayout>
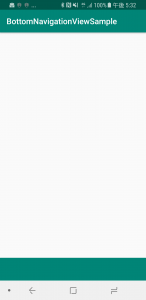
ここまでで、次のようなとてもシンプルな画面が完成しました。
ちなみに
android:layout_height="56dp"
の「56dp」は、Google IO 2018アプリのBottomNavigationViewの高さを参考にしました。
Material Design Guidelineにも56dpにするように指定されています。
FloatingActionButtonを設置する
次に、めり込ませるFloatingActionButtonを設置します。
<androidx.coordinatorlayout.widget.CoordinatorLayout xmlns:android="http://schemas.android.com/apk/res/android"
    xmlns:app="http://schemas.android.com/apk/res-auto"
    android:layout_width="match_parent"
    android:layout_height="match_parent">

<!-- ... -->

    <com.google.android.material.bottomappbar.BottomAppBar
        android:id="@+id/bottom_app_bar"
        android:layout_width="match_parent"
        android:layout_height="56dp"
        android:layout_gravity="bottom"
        app:backgroundTint="#008577"
        app:fabAlignmentMode="center" />

    <com.google.android.material.floatingactionbutton.FloatingActionButton
        android:id="@+id/fab"
        android:layout_width="wrap_content"
        android:layout_height="wrap_content"
        android:src="@drawable/ic_attach_money_white_24dp"
        app:layout_anchor="@id/bottom_app_bar" />

</androidx.coordinatorlayout.widget.CoordinatorLayout>
重要なのは
app:layout_anchor="@id/bottom_app_bar" />
この部分です。
この1行だけで、BottomAppBarによしなに設置してくれます。
これだけで、BottomAppBarにFloatingActionButtonがめり込みました。

ちなみに、BottomAppBarの
app:fabAlignmentMode="center"
を “end” に変えると、FloatingActionButtonが右側に設置されます。

おまけ
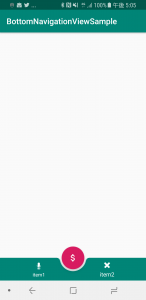
これだけだとシンプルすぎるので、BottomAppBarにBottomNavigationViewを追加します。
まずはBottomNavigationViewで表示するためのメニューを res/menu/bnv_menu.xml に用意します。
<menu xmlns:android="http://schemas.android.com/apk/res/android">
    <item
        android:id="@+id/item1"
        android:icon="@android:drawable/ic_btn_speak_now"
        android:title="item1" />

    <item
        android:id="@+id/item2"
        android:icon="@android:drawable/ic_delete"
        android:title="item2" />
</menu>
次に、BottomNavigatoinViewをBottomAppBarの中へ追加します。
<androidx.coordinatorlayout.widget.CoordinatorLayout xmlns:android="http://schemas.android.com/apk/res/android"
    xmlns:app="http://schemas.android.com/apk/res-auto"
    android:layout_width="match_parent"
    android:layout_height="match_parent">

 <!-- ... -->

    <com.google.android.material.bottomappbar.BottomAppBar
        android:id="@+id/bottom_app_bar"
        android:layout_width="match_parent"
        android:layout_height="56dp"
        android:layout_gravity="bottom"
        app:backgroundTint="#008577"
        app:fabAlignmentMode="end">

        <com.google.android.material.bottomnavigation.BottomNavigationView
            android:id="@+id/bottomNavigationView"
            android:layout_width="match_parent"
            android:layout_height="match_parent"
            app:itemIconTint="#ffffff"
            app:itemTextColor="#ffffff"
            app:menu="@menu/bnv_menu" />

    </com.google.android.material.bottomappbar.BottomAppBar>

    <com.google.android.material.floatingactionbutton.FloatingActionButton
        android:id="@+id/fab"
        android:layout_width="wrap_content"
        android:layout_height="wrap_content"
        android:src="@drawable/ic_attach_money_black_24dp"
        app:layout_anchor="@id/bottom_app_bar" />

</androidx.coordinatorlayout.widget.CoordinatorLayout>
これで次のような画面が完成しました!

BottomNavigationViewのItemが選択された時に画面(Fragment)を切り替えたい場合は次のようにします。
bottomNavigationView.setOnNavigationItemSelectedListener { item ->
            when (item.itemId) {
                R.id.item1 -> {
                    setFragment()
                    return@setOnNavigationItemSelectedListener true
                }
                R.id.item2 -> {
                    setFragment()
                    return@setOnNavigationItemSelectedListener true
                }
                else -> {
                    setFragment()
                    return@setOnNavigationItemSelectedListener true
                }
            }
        }
まとめ
とても簡単に実装できました!
これをうまく活用すれば、リッチでかっこいい画面が作れるかもしれませんね!